A few years ago, I finished up Angel of Cross Stitch. She had, I believe, 391 colors of DMC floss in the whole project. One of the big questions I got from other stitchers was about managing my thread. How did I organize it? Did I use one needle or several needles threaded with different colors? Well, with that project I just pulled my boxes of DMC floss (I keep it on cardboard bobbins in plastic boxes) out and stacked them on the ottoman in front of me and pulled out what I needed as I needed it.
But Baby Ghosts is different. I only have to deal with 73 colors, most of which need one skein or less with a few needing two or three skeins and then 16 skeins of black floss. So how do I keep the colors straight? First, I decided to buy fresh floss for the whole project. It will take a long time and it drives me crazy when a color is unavailable because it's stuck in another project. I also won't have to worry about little dye lot changes. Then I looked at how the colors were used on my chart. I saw that most of the colors were used in either large areas or over multiple areas of the chart. That means that I'll need most of my colors easily available for the entire project. I have a number of the size 26 needles I'm using for this project in my stash and can get more quite inexpensively in bulk from my local needlework shop, so I can have a threaded needle for each color.
I bought some bobbins and rings. Each thread color except black goes on a bobbin. Each bobbin is marked with both the DMC number and the chart symbol. Then the floss is put on the big rings in the same order as they are on the chart. I pulled out my Pako needle organizer and will use that for all the colors except black. I have a second Pako I'll have to use since each only holds fifty needles. When I use a color for the first time, that threaded needle will go into the correct opening on the Pako. I have the green tomato pincushion for the black floss.
By cutting down on the time needed to find and change out my thread, I hope to have this project move along a little faster. All the needed floss is in one place in a form that's easy for me to find when I need it. In the meantime, the scotch has worn off and I've come to my senses. Someday has come but it's gone as well. So this project is going back in my kitted projects while I finish up my more urgent WIPs. I want to complete "To Honor Elsa" and then get "Cleopatra's Cat" finished in time to send it in for evaluation.
Thursday, November 22, 2012
Wednesday, November 21, 2012
I did a bad thing....
....and started a new project. I have been trying to work my way through my existing Works in Progress (WIPs) and being careful to not purchase any new projects (though somehow acquiring a free one from someone else's stash reduction doesn't seem to count). But the other night, after relaxing with a scotch on ice, I got the brilliant idea to pull out a kitted-up project and get it started.
And it's a big project. BIG.
Some of you may know about the trend over the last decade or so toward computer-generated charts. A designer will start by importing an image into a computer program which converts it into a stitchable image. A GOOD designer will then fine-tune the image to improve the balance and color issues. In the early days of this technology, the goal was to create an chart that was similar to the old hand-drawn charts and to feature an image stitched with a lot of background fabric still showing. Over the past few years, however, the goal has been to recreate artwork in it's entirety with a chart that requires the needleworker to completely cover the fabric. In a way it's like the old tent-stitched needlepoint charted projects except that there typically are a lot more stitches per inch so that the design is more detailed.
A few year's ago, I was at Stitcher's Paradise in Las Vegas. I highly recommend stopping by if you have a chance. This piece called Baby Ghosts by Mystic Stitch was on loan to them by a customer. I loved it! The only problem were those little words at the bottom: "stitches: 250 x 352." What does that mean? Well, we multiply those numbers together to get the amount of little x's you're gonna have to make to finish this chart.
88,000.
Using 73 different colors.
Hmmm....
Looked like I would BE a ghost by the time I finished this one. But it was so cute! So I got the chart and started collecting the DMC floss (including the 16 skeins of black) needed for this. I dug out some 18-count aida that I'd picked up at a sale and decided to baste a grid onto the fabric. I thought it wouldn't take more that a couple of hours to work out and stitch the gridding. It took two full days. However, I expect that I'll save time being able to easily locate my stitching location.
Here is my fabric with the grid on it. I used three colors of thread: yellow for the 10 x 10 stitches grid to match the chart, dark green for the edge of each of the 25 (!) pages of the chart, and red to mark the middle of the overall chart. As I reach a basted line, I cut and remove just that part that's in the way so that I don't end up stitching into it and having trouble removing it later.
Here is a close up of the area near the upper middle of my chart. You can better see the different lines. Note that the page edges are often off from the general 10-stitch grid area. After I finished getting the grid on, I put the whole thing away for "someday." As you can see by the stitching on it, someday arrived.
After getting this big project gridded, I had to decide how to handle 73 floss colors. I'll talk about that later.
And it's a big project. BIG.
Some of you may know about the trend over the last decade or so toward computer-generated charts. A designer will start by importing an image into a computer program which converts it into a stitchable image. A GOOD designer will then fine-tune the image to improve the balance and color issues. In the early days of this technology, the goal was to create an chart that was similar to the old hand-drawn charts and to feature an image stitched with a lot of background fabric still showing. Over the past few years, however, the goal has been to recreate artwork in it's entirety with a chart that requires the needleworker to completely cover the fabric. In a way it's like the old tent-stitched needlepoint charted projects except that there typically are a lot more stitches per inch so that the design is more detailed.
88,000.
Using 73 different colors.
Hmmm....
Looked like I would BE a ghost by the time I finished this one. But it was so cute! So I got the chart and started collecting the DMC floss (including the 16 skeins of black) needed for this. I dug out some 18-count aida that I'd picked up at a sale and decided to baste a grid onto the fabric. I thought it wouldn't take more that a couple of hours to work out and stitch the gridding. It took two full days. However, I expect that I'll save time being able to easily locate my stitching location.
Here is my fabric with the grid on it. I used three colors of thread: yellow for the 10 x 10 stitches grid to match the chart, dark green for the edge of each of the 25 (!) pages of the chart, and red to mark the middle of the overall chart. As I reach a basted line, I cut and remove just that part that's in the way so that I don't end up stitching into it and having trouble removing it later.
Here is a close up of the area near the upper middle of my chart. You can better see the different lines. Note that the page edges are often off from the general 10-stitch grid area. After I finished getting the grid on, I put the whole thing away for "someday." As you can see by the stitching on it, someday arrived.
After getting this big project gridded, I had to decide how to handle 73 floss colors. I'll talk about that later.
Labels:
Baby Ghosts,
Mystic Stitch,
Stitchers Paradise
Tuesday, November 20, 2012
Been to Santa Fe
Since my last post, I've been quite busy. I did not finish the Spooky Halloween Mantle so it went back into the UFO pile for awhile. I finished up another project I can't talk about yet (Christmas gift). I've also been working on a local EGA chapter project. But most of my time has been taken by my trip to Santa Fe for the EGA national seminar.
I took a four-day class taught by Marnie Ritter called "To Honor Elsa." When Elsa Williams ran her needlework school many years ago, Marnie started first as a student and then became a teacher for Elsa. Marnie received permission to redesign one of Elsa's classic crewel designs for silk. I really enjoyed the class! Here is a photo of the model over my partially-finished piece. The twill Marnie used for this project is wonderful for needlework.
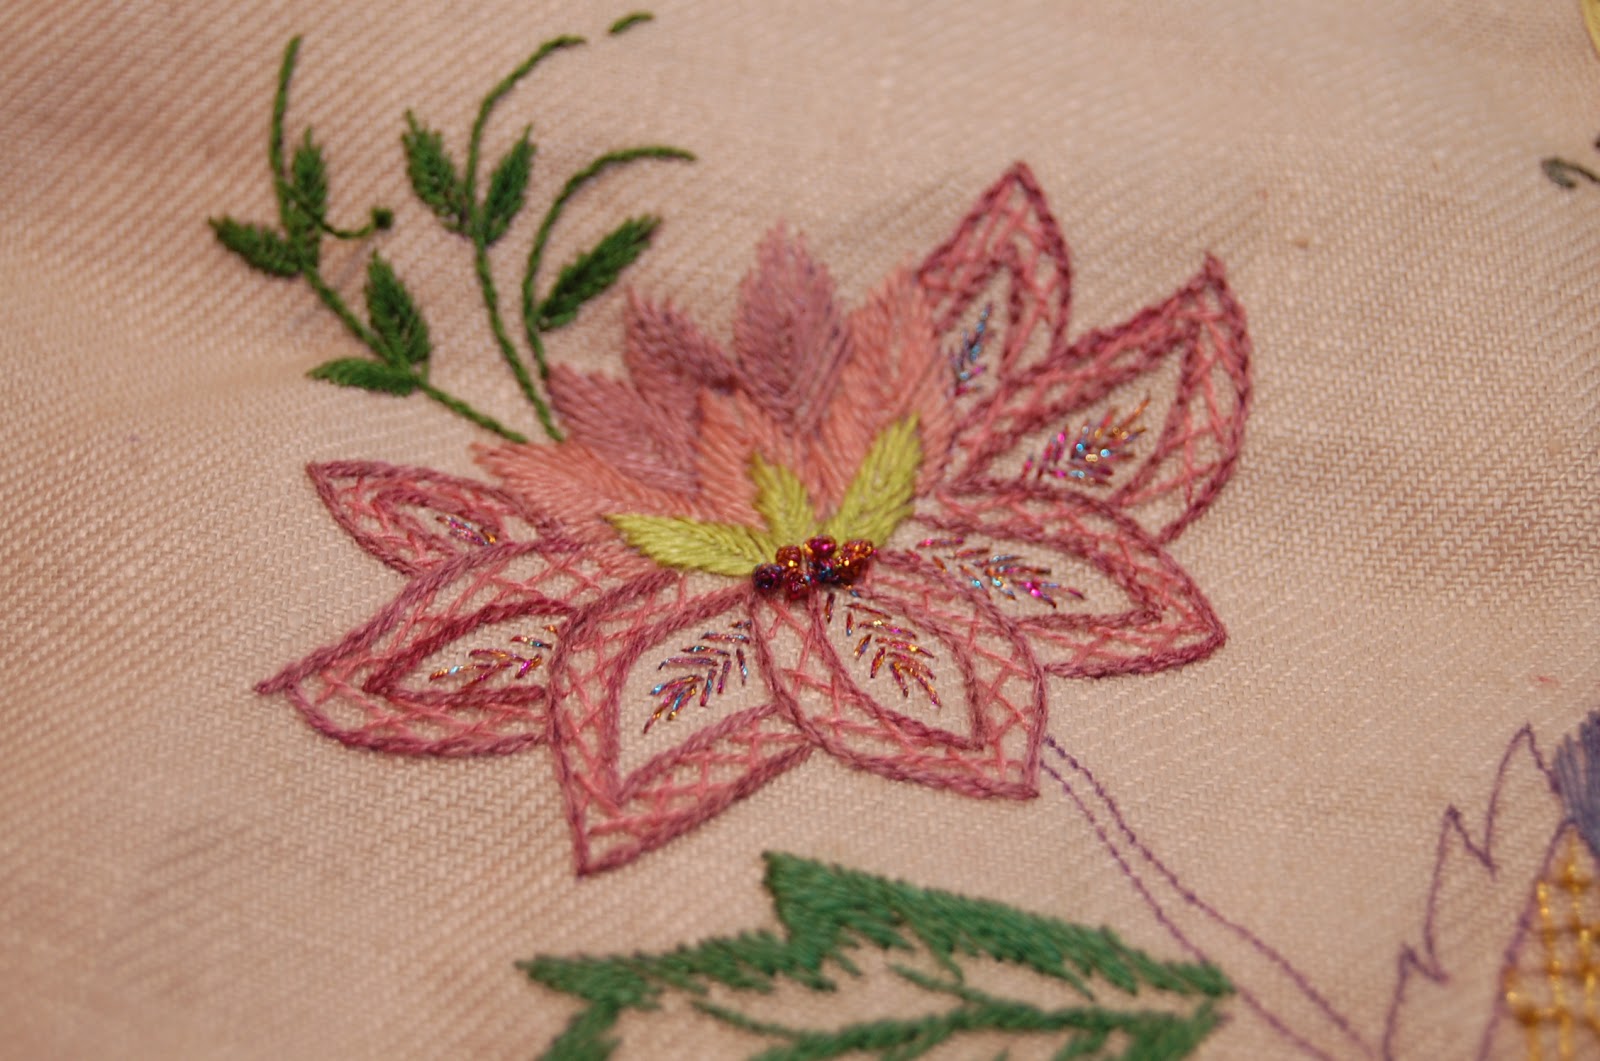
Here is a close-up of the top flower. The petals are outlined in chain stitch, a big irregular cross stitch is used to fill in the outer part of each petal, and then straight stitches are used for the center of each petal. Fishbone stitch is used to make the two pink and the green center of the flower. See how I've left just a little bit of stitching detached at the top of the center stem? One of the elements Marnie talked about was keeping things open, even a little detached.
Here is my partially finished bottom flower. You can see some of the satin shading stitches for the pink petals. That line around the orange petals is a buttonhole satin stitch, as is the multicolored metallic on the right.I really like that effect.
Then these fun little guys were worth the class alone. They're whipped spider web flowers with a bead in the middle. The droop is french knots, some wrapped twice and some wrapped only once. All these stitches (except the metallics) were done with a single strand of silk floss. I thought it would take a long time but it actually went surprisingly fast.
I'm more comfortable with counted thread work but overall was pleased with how this project progressed. Now that I'm caught up on my EGA chapter basket band, I need to finish this up while the techniques are fresh in my mind. Between the class, meeting with other stitchers, and the merchandise night I really enjoyed the seminar. I'd never been to Santa Fe before and I thought it was a beautiful little city. I had great green chile stew and sopapillas, bought a turquoise necklace from a native artisan at the governor's palace and did a little Christmas shopping. Overall it was a great trip.
I took a four-day class taught by Marnie Ritter called "To Honor Elsa." When Elsa Williams ran her needlework school many years ago, Marnie started first as a student and then became a teacher for Elsa. Marnie received permission to redesign one of Elsa's classic crewel designs for silk. I really enjoyed the class! Here is a photo of the model over my partially-finished piece. The twill Marnie used for this project is wonderful for needlework.
Here is a close-up of the top flower. The petals are outlined in chain stitch, a big irregular cross stitch is used to fill in the outer part of each petal, and then straight stitches are used for the center of each petal. Fishbone stitch is used to make the two pink and the green center of the flower. See how I've left just a little bit of stitching detached at the top of the center stem? One of the elements Marnie talked about was keeping things open, even a little detached.
Here is my partially finished bottom flower. You can see some of the satin shading stitches for the pink petals. That line around the orange petals is a buttonhole satin stitch, as is the multicolored metallic on the right.I really like that effect.
Then these fun little guys were worth the class alone. They're whipped spider web flowers with a bead in the middle. The droop is french knots, some wrapped twice and some wrapped only once. All these stitches (except the metallics) were done with a single strand of silk floss. I thought it would take a long time but it actually went surprisingly fast.
I'm more comfortable with counted thread work but overall was pleased with how this project progressed. Now that I'm caught up on my EGA chapter basket band, I need to finish this up while the techniques are fresh in my mind. Between the class, meeting with other stitchers, and the merchandise night I really enjoyed the seminar. I'd never been to Santa Fe before and I thought it was a beautiful little city. I had great green chile stew and sopapillas, bought a turquoise necklace from a native artisan at the governor's palace and did a little Christmas shopping. Overall it was a great trip.
Labels:
Elsa Williams,
Marnie Ritter,
Santa Fe,
To Honor Elsa
Tuesday, September 25, 2012
Spooky Halloween Mantle
I am enjoying a few days of stitching bliss.
Day 1 start. This kit from Bent Creek actually came in three parts. It's done on 18-count linen over 2 threads with pearl cotton so it goes pretty fast. That a photo of the finished design at the bottom.
Here is the end of day 1. My owl now can fly and see and the cat must contend with a spider. I'm stitching in hand (without a hoop or frame). I may switch over to a charity project because I have time constraints on that and, since I won't get this done in time for Halloween this year anyway, I should save it for doing on an upcoming plane trip.
I'm really proud that I've finally figured out how to update my blog from my iPad. Now I can update when I'm out of town!
Friday, September 21, 2012
Just a quick post
I wanted to let you all know about the blog I write for the Baldy View EGA chapter I joined a few years ago.
I've spent a lot of time today trying to figure out some stuff on my smartphone and feeling a little dumb about it so not a lot of needlework is happening right now. In the meantime, here's a non-needlework picture of my daughter's dog Thor just because he's cute. I'm going to bed now.
Tuesday, September 18, 2012
Halloween Stitching
With the weather cooling down at my house (which here means falling below 100° F.) I feel like Halloween is on the way. Here are some of my current and past Halloween projects.
Kerry Ince from We, Of The Needle in Brea framed "Ghoul School" by Glendon Place for me. I added glow-in-the-dark blending filament to my ghosts. The characters were easy because all their heads are buttons.
Next is a project I'm planning to start called "Corn-elia" by Ann Strite-Kurz. This is designed to be an ornament but someone in Inland Empire EGA has already finished it as a needle book. It's just the right size for a scissor case, too.
Some past Halloween Projects:
I don't remember the designer but I did this a few years ago. I added the red letters over the cat. Isn't he fierce! He's framed in a shadowbox with Halloween accents.


"Remember Me" by Birds of a Feather. This was my first time stitching with over-dyed thread. The motto is one of my favorites. It's usually in some flowery Victorian-style sampler but it really rocks with a witch and skeleton. This was framed by Bob at Needles and Niceties in Upland.

This little Mill Hill kit is stitched on paper. Again, I added glow-in-the-dark to the ghost. It was the first time I'd done that and I felt so clever.
This Mill Hill kit is stitched on fabric. I liked the look of it on the stretcher bars so much that I just left it on.
"Scared Silly" by Bird's of a Feather. I like her designs. I bought a frame to put this in before I started stitching it. Yeah, I stitched it in 2010 and yeah, it's still not framed. Now THAT'S scary.
Kerry Ince from We, Of The Needle in Brea framed "Ghoul School" by Glendon Place for me. I added glow-in-the-dark blending filament to my ghosts. The characters were easy because all their heads are buttons.
Next is a project I'm planning to start called "Corn-elia" by Ann Strite-Kurz. This is designed to be an ornament but someone in Inland Empire EGA has already finished it as a needle book. It's just the right size for a scissor case, too.
Some past Halloween Projects:
I don't remember the designer but I did this a few years ago. I added the red letters over the cat. Isn't he fierce! He's framed in a shadowbox with Halloween accents.
"Remember Me" by Birds of a Feather. This was my first time stitching with over-dyed thread. The motto is one of my favorites. It's usually in some flowery Victorian-style sampler but it really rocks with a witch and skeleton. This was framed by Bob at Needles and Niceties in Upland.
This little Mill Hill kit is stitched on paper. Again, I added glow-in-the-dark to the ghost. It was the first time I'd done that and I felt so clever.
This Mill Hill kit is stitched on fabric. I liked the look of it on the stretcher bars so much that I just left it on.
"Scared Silly" by Bird's of a Feather. I like her designs. I bought a frame to put this in before I started stitching it. Yeah, I stitched it in 2010 and yeah, it's still not framed. Now THAT'S scary.
Labels:
Corn-elia,
Ghoul School,
Halloween,
Remember Me,
Scared Silly
Saturday, September 1, 2012
The Wedding Sampler is Done
I recently went to see a Lichtenstein exhibit and realized how easily his work translated into photographs because it was, like the graphic art that inspired him, flat and uniformly finished. Really, when you've seen a good quality photo of his work you've pretty much seen the piece (though you should go to an exhibit if you can because his art really is fun). However, so many other artists make texture and finish so much a part of their work that even the best photo can't truly capture it. I remember the first time I saw Van Gogh's Starry Night. I'd seen that image all my life but the real piece was so alive in comparison. Needlework is like that too. While my piece is done in a uniform cross stitch, the gloss of the floss laid in uniformity contrasting with the gleam of the metallics against the matte of the fabric make a contrast that can't be well translated into a photograph.
Labels:
1Corinthians Wedding Sampler,
Stoney Creek
Subscribe to:
Posts (Atom)